Getting Started
INFO
To get started with Regolith, you should first read our introduction page, and the installation page.
You can test for installation by running regolith inside of a terminal. This guide will assume you have installed regolith directly, but you can follow along with a stand-alone build. Just ensure that the executable is placed inside of your project folder.
If you run into issues installing, you can check our troubleshooting guide for tips.
WARNING
Regolith is a command line application. It assumes some familiarity with how to navigate and use the command line. You can get a refresher here.
Creating a new Project
To create a new project, navigate to a blank folder, and run regolith init. This will create a few files:
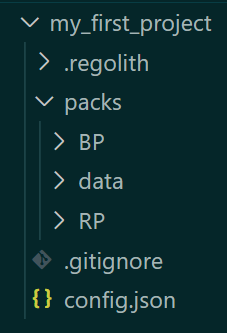
In short:
.regolithis a special folder that regolith uses to store data. You don't need to look here.packs/BPstores your behavior pack.packs/RPstores your resource pack.packs/datais a special folder that filters can use to store data.config.jsonis the configuration file for Regolith..gitignoreis a file which tells Git source control to ignore certain files. It's not a partof of Regolith but we highly recommend using Git to manage your projects.
Config file
Next, open up config.json. We will be configuring a few fields here, for your addon.
json
{
  "name": "Project name", // Enter your pack name here. (Example: spooky_gravestones)
  "author": "Your name",  // Enter your author name here. (example: SirLich)
  "packs": {
    "behaviorPack": "./packs/BP",
    "resourcePack": "./packs/RP"
  },
  "regolith": {
    "profiles": {
      "default": {
        "filters": [],
        "export": {
          "target": "development",
          "build": "standard",
          "readOnly": false
        }
      }
    },
    "filterDefinitions": {},
    "dataPath": "./packs/data"
  }
}
Later on you can play with the additional configuration options, but for now, just set a project name, and author name.
TIP
We suggest using a name like dragons or cars for the project name, as opposed to My Dragon Adventure Map, since the project name will be used as the folder name for the final export if you're using the "development" export target.
Creating your Addon
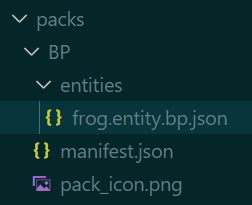
At this point, you will want to add some files into your regolith project. If you have an existing project, you can copy/paste the files into the RP (resource pack) and BP (behavior pack) folders.
If you don't have an addon prepared, you may also create a fresh one directly in your project folder, following the normal rules. Add a manifest.json, a pack_icon.png, and any other files you want. The files should go directly into the RP and BP folders, like this:
Running Regolith
There are two ways of running Regolith profiles regolith run and regolith watch. They both run a profile defined in config.json file.
The regolith run [profile-name] command runs provided profile once. If you don't specify a profile, it will run the profile named "default".
The regolith watch [profile-name] command works the same as regolith run, but it will watch your source files and rerun the profile when they change. If you're using regolith run you have to do it manually every time.
By default the export is set to "development", which means that the files will be copied to the development_behavior_packs and development_resource_packs folders of com.mojang. The names of folders created in this export mode are based on the name of the project like project_name_bp and project_name_rp.
Adding your first Filter
Regolith contains a very powerful filter system, that allows you to write filters in many languages, as well as running existing filters from the internet. For now, we will simply use the standard library, which is a set of approved filters that we maintain.
As an example, we will use the texture_list filter, which automatically creates the texture_list.json file for you. To learn more about this file, and why automating it is helpful, read here.
Installing
WARNING
The install command relies on git. You may download git here.
You can install this filter by running regolith install texture_list, which will make the filter available for use.
The last step is selecting where/when the filter will run. In our case, we want to run the filter every time we export using the default default profile.
You should adjust the default profile in config.json to look like this:
json
"default": {
  "export": {
    "readOnly": false,
    "target": "development",
    "build": "standard"
  },
  "filters": [
    {
      "filter": "texture_list"
    }
  ]
}
Running
Now, you can re-run regolith run.
Check com.mojang, and open the new texture_list.json file in RP/textures/texture_list.json. Every time you run regolith, this file will be re-created, based on your current textures. No need to manually edit it ever again!
WARNING
Warning: If your resource pack already contains texture_list.json, you should delete it. You don't need to manually worry about it anymore - Regolith will handle it!
WARNING
Warning: If your project doesn't have any textures, than texture_list.json will simply create a blank file []. Consider adding some textures to see the filter at work!
Whats Next
Now that you've created your first Regolith project, and installed your first filters, you are well on your way to being a Regolith expert! You should check out the standard library, to see if additional filters might be useful for you.
Otherwise, you can learn about writing custom filters or dive deeper into Regolith commands by reading about Filter Run Modes and Installing and Updating Filters.